How To Make a Cookie Box.

Two days until December and it’s time to start thinking about how you’re going to assemble those cookie boxes this year. If you want to! Of course, it’s highly optional, but highly rewarding holiday gifting activity if you choose to do it!

Growing up in small town Indiana as part of a close knit and large extended family, cookie plates were a THING. You knew that Aunt Lee and Aunt Dianne and any number of any family members and friends were going to drop by the house the week before Christmas bearing cookie plates. Everyone had their favorite cookie on the plate and as one of six kids, you had to be quick if you wanted to get one.

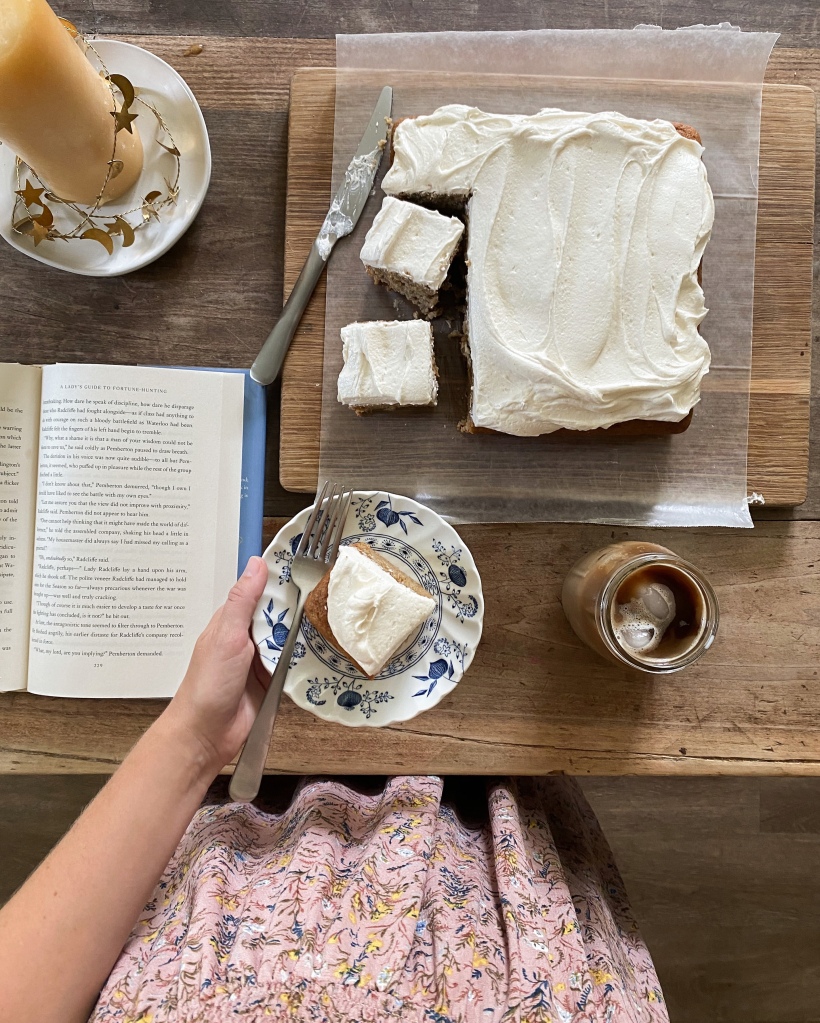
Enter my own adulthood and last year I made my own cookie boxes for friends and neighbors down here in Florida. Iโ€™m not sure how other people do it, but I started early and it made for a really manageable Christmas cookie timeline that didnโ€™t make me feel overwhelmed.

To do now: make your list of cookies/candies. I did 8 last year and will aim for the same this year. Iโ€™ll share recipes in the coming weeks, but I did – caramels, buckeyes, sugar cookies, molasses cookies, peanut butter blossoms, gingerbread, chocolate chunk shortbread, peppermint brownie cookies. Iโ€™m switching out a few but will keep most the same because part of the joy is the predictability.

To do each week from now until gifting time: make a couple doughs and stick it in the freezer. Did you know you can freeze cookie dough for up to 3 months? Last year I waited until the week before Christmas and made one dough each night and froze. It wasnโ€™t awful but I think two a week is more manageable and doesnโ€™t take away the joy. I’ll do one on a quiet night during the week and one on the weekend. Wait until the week of to make any candies (caramels, fudge, peppermint bark, candied oranges, etc) as those wonโ€™t freeze well. I have my sugar cookie dough in the freezer already and molasses cookies are slated for tonight.

To do at any time leading up to Christmas: find your cookie boxes. This actually gave me some trouble last year, so this year Iโ€™ll be scouting ahead. Hobby Lobby and Michaels seem to be the best resources for these little cardboard boxes for small or medium batches. Source your sprinkles and any cute decorations you want to use! Buy early as they sell out quickly. And get the giant cookie sheets. Itโ€™s 100% worth not having to do multiple batches and just getting the cookies all in the oven in one go. For your pretty instagram picture, you’re going to want to find a nice wooden box to arrange them all. I found a couple in the dollar spot at Target this year, and last year mine was from Michael’s. Check the jewelry section. They have a little wooden box with compartments that are perfect for cookies.

The night before baking day: put your doughs into the fridge to defrost overnight.

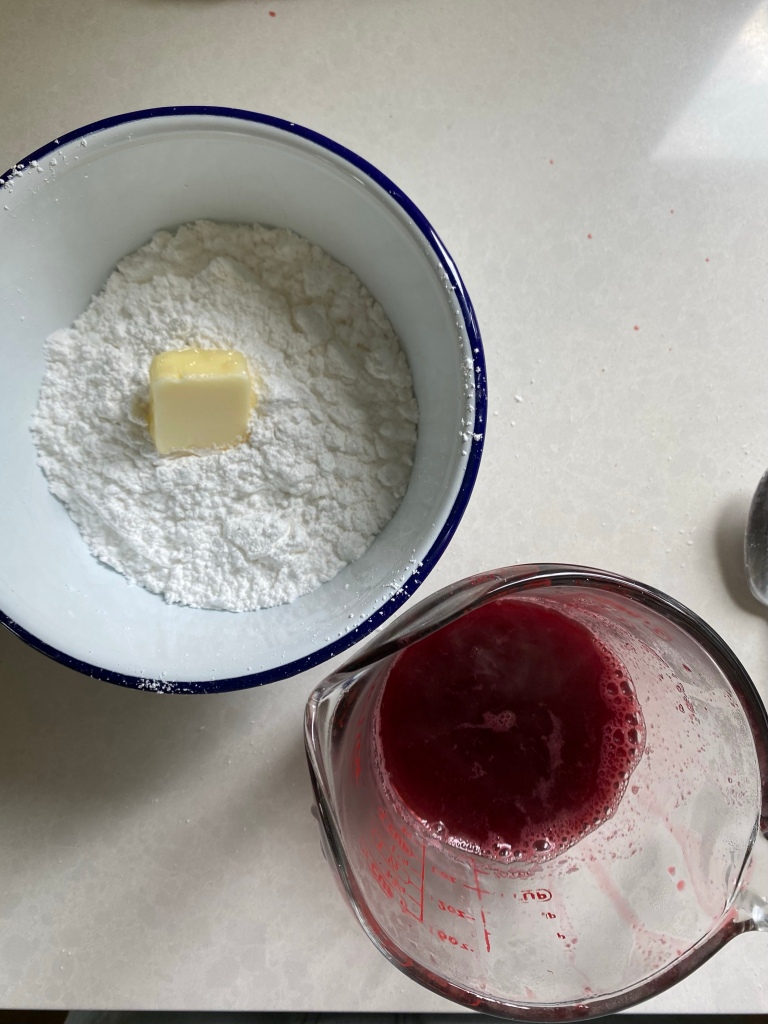
The week of: make your candies, your frostings. Pick up any extra supplies you might need.

The day before: bake your roll out sugar cookies. Stick them in the fridge after baking so that you can decorate them on baking day. You could even get these completely done and also ice them as theyโ€™re the most time consuming.

On baking day: set aside much of your day for baking and clean up. Youโ€™ve done the hard work! Now you just have to get it all baked and decorated. If youโ€™re not dropping off your cookies on the same day – donโ€™t make the boxes yet. Especially if youโ€™re making a cookie with a peppermint or peanut butter profile. The taste will definitely seep into the other cookies.

Try to gift your cookies asap! The fresher the better!!

I’m going to do another post this week with some suggestions of cookies that are yummy! If it’s your first year, maybe just try a couple cookies and gift them to friends and family. Happy baking season friends!!

Any questions?? Drop them in comments! I

Applesauce Cake with Brown Butter Frosting.

Is it brown butter or is it browned butter? My research has brought back answers for both. Whichever way you want to say it – I do believe it may be Godโ€™s greatest gift to man, much as I love my children. And around this time of year I canโ€™t get enough of it. The brown butter, not my kids. But Iโ€™ll allow that theyโ€™re pretty great too. I have plans to put brown butter into a pumpkin sheet cake in October, in a pasta sauce with sage to nestle homemade ravioli into later this month, and perhaps most famously into my chocolate chip cookies on another occasion. Whether youโ€™re using it in sweets or dinner, it adds a delicious nuttiness that is so distinct and dare I say, life changing? Now, if you have no idea what Iโ€™m talking about, you might want to read this article on achieving brown butter rather than burnt butter. You probably think the cake should be the main topic of conversation here and I love it too! Itโ€™s a winner! The people will love the cake! But the frosting, oh yes, the frosting, is the part of this recipe that takes it to the next level.


Applesauce Cake with Brown Butter Frosting

For the cake:
Baking spray
2 cups unsweetened applesauce
1ยผ cups packed light brown sugar
ยพ cup canola oil
3 tsp pumpkin pie spice (or a combination of cinnnamon, ginger and nutmeg)
1 tsp lemon zest
1 tsp vanilla extract
2 large eggs
2ยฝ cups all-purpose flour
1 tsp baking powder
1 tsp baking soda
ยฝ tsp salt

For the frosting:
1 ยฝ cup (3 sticks) unsalted butter, divided. Two sticks should be softened to room temperature. The third stick, youโ€™ll brown.
4 cups powdered sugar
2 Tbsp whole milk
ยฝ t vanilla
ยผ tsp salt

Prepare the Cake:
Preheat oven to 350 degrees. Coat a 9 x 9 inch pan with baking spray and dust with flour – alternatively you could make this in a 9 x 13 pan for a thinner cake or even in muffin form, but be sure to adjust your baking time. In a large bowl, whisk together brown sugar, oil, pumpkin pie spice, lemon zest, vanilla extract, eggs, and applesauce in a large bowl until combined. Whisk in flour, baking powder, baking soda, and salt until just combined. Spoon batter into prepared pan. Bake in preheated oven until a wooden toothpick inserted in the center comes out clean, 40-50 minutes. Transfer to a wire rack,
and cool completely in pan, about 1 hour.

Prepare the Frosting:
Melt 1/2 cup (one stick) butter in a medium saucepan over medium until it begins to bubble, forms little brown bits, and smells nutty. Transfer to a freezer safe container and put in freezer for 10-15 minutes or until room temperature. In a mixer, combine brown butter, 1 cup (2 sticks) softened butter, powdered sugar, milk, salt and vanilla. Mix on medium for about three minutes or until fluffy. Spread frosting generously over cooked cake with an offset spatula, cut and enjoy (preferably with a book and iced coffee on the side).

You will most likely have extra frosting, but the frosting is truly the best part of this cake. Just put it in a jar, and store in the fridge for another cake next week! This cake, after all, will not last long on your counter if your house is anything like mine.

A Small Blackberry Cake.

I love a big old layer cake for a birthday or big party, but for a special little weekend treat or a mid-week pick me up, make it tiny. I don’t need a big cake lingering around my kitchen tempting me (and my children) for too long. Just big enough for a Sunday dessert and a snack during the week (and ok, maybe enough so that I can have breakfast cake one day, because leftover cake does make the best breakfast, as I’m sure you well know.)

I adapted this recipe from the Very Vanilla Cake from Simple Cake by Odette Williams. It almost feels more like a muffin than cake. Muffin Cake! I love it. It was yummy, and I recommend you make it. I used a six inch by 3 inch cake pan, but I think you could use an 8 inch cake pan if you only have that. It will just be thinner, and you’ll want to adjust your baking time!


Blackberry Cake with Blackberry Glaze

2 tsp freshly squeezed lemon juice
1/2 cup whole milk
2 eggs, at room temperature
3/4 cup granulated sugar
1 1/2 cup all-purpose flour
1 tsp baking powder
1/4 tsp baking soda
1/8 tsp cinnamon
1/4 tsp salt
8 T (1 stick) unsalted butter, at room temperature
1 cup blackberries, chopped if very large
3 T mild-flavored oil, such as canola

Preheat the oven to 350ยฐF. Prepare pan by greasing a 6 by 3-inch cake pan with butter, line the bottom with parchment paper, and grease the paper.

Add the lemon juice to the milk to sour it. Set aside for 5 to 10 minutes or until curdled.

In a small bowl, whisk the eggs together. Set aside.

Place a large sifter or a sieve in a large mixing bowl. Add the flour, baking powder, baking soda, cinnamon and salt and sift.

Using an electric mixer with beaters or a paddle attachment, beat the butter for 30 seconds on medium speed and then gradually add the sugar. Scrape down the sides of the bowl. Continue beating on medium speed for another 4 minutes or until light in color and fluffy.

With the mixer still on medium speed, gradually add the eggs. If the batter curdles, add 1 to 2 tablespoons of the flour to bind it back together.

On low speed, add the flour mixture and then the oil and milk; mix until just combined. Donโ€™t overbeat. Scrape down the sides and bottom of the bowl. Add blackberries and fold in with a rubber spatula.

Pour the batter into the prepared pan and smooth the top. Bake in the center of the oven for 50 to 55 minutes. When a wooden skewer inserted into the center comes out clean, and the cake bounces back when lightly pressed, remove the cake from the oven and let it stand to cool. Run a butter knife around the cake to gently release. Invert the cake, peel off the bottom piece of parchment, and cool on a wire rack.

When completely cool, pour glaze onto center of cake and let it run down the sides. Decorate if you choose to with extra blackberries, cut, and watch disappear!

For the Glaze:
1 cup (115g) confectioners’ sugar
1 tablespoon butter
2-4 tablespoons very hot blackberry juice

Sift the sugar into a small bowl and make a well in the middle. Add the butter to the well. On the stove combine about 1/2 cup water with 1 cup blackberries. Bring to boil and mash the blackberries. Strain into a measuring cup, discard pulp or you could mix that in with the cake. Start with 2 tablespoons and pour into your small bowl into the well of butter. Mix and add a bit more until you get the right drippy consistency. It should be thin enough to drip off your spoon slowly, but not so thin that it will just run off of your cake.

How to Make Letter Donuts.

Way back in April, I started planning out my May bakes. Iโ€™ve talked about my monthly planning process before, but if you missed it – I usually plan the entire month of bakes all at once. Usually one or two things a week – something dessert-y and something breakfast-y/afterschool snack-y. It keeps me on track and help reduce decision fatigue throughout the month. Having too many options isnโ€™t always a good thing, for me at least.

Anyway, I knew that I wanted to do something super fun for the last day of school for the boys (and for me! lol). Cake? (Did that last year for the last day of school, so meh.) Pie? (A possibility, but I make a lot of pie during the summer, so I didnโ€™t want to overdo it right off the bat.) Donuts? Now here, we had a real possibility. Iโ€™ve only made homemade yeast donuts one other time and they were gooooood, but I wanted to do something kind of wild. I wanted to make donuts in the shape of letters. Donuts with a message!! Please don’t give me all the credit for this idea though. Itโ€™s not that original. Iโ€™ve seen donut shops make letter donuts, and Iโ€™m sure I saw it on Pinterest long ago. And when I was researching how to do it, I watched a few helpful YouTube video tutorials. But could I do it? Well, obviously, I gave it a shot and they turned out SO CUTE. You guys, the possibilities are endless here!! You could make any message you wanted! What a cute centerpiece for a baby shower, a birthday party, anniversary, graduation party, etc. I mean like I saidโ€ฆendless. I wanted to jot down a few notes here for future reference for you (and for me) if you ever decide you want to give letter donuts a try.

If youโ€™d like to read the full recipe from the original source at Delish click here. I used the โ€œhow to make donuts at homeโ€ recipe and it did not disappoint. The recipe comments were especially helpful when thinking through how to make the dough the best it could be.

I will jot the recipe down here too, just in case it ever disappears from their website. I also plan to add this recipe to my family cookbook (I just write all of our โ€œkeeperโ€ recipes in one notebook to have all together.). This is one I will make again. Iโ€™m including my edits to the recipe here (less flour in the dough, more milk in the glaze) so if you want the original, go to their site!


Yeast Donuts

1 cup whole milk
1/4 cup plus 1 teaspoon granulated sugar, divided
2 1/4 teaspoons active dry yeast
4 cups plus 1/2 cup all-purpose flour, plus more for rolling
1/2 teaspoon salt
6 tablespoons butter, melted
2 large eggs
1/2 teaspoon vanilla
Canola or vegetable oil, for frying

Glaze
1/3 cup whole milk
2 cups powdered sugar
1/2 teaspoon vanilla

Grease a large bowl with cooking spray and set aside. In a small, microwave-safe bowl add the milk. Microwave until lukewarm, 40 seconds. Add a teaspoon of sugar and stir to dissolve, then sprinkle over yeast and let sit until frothy, about 8 minutes.

In a medium bowl, whisk together 4 cups of the flour and the salt.

In a large bowl or stand mixer, beat together remaining sugar, butter, eggs, and vanilla.

Pour in yeast mixture, mix to combine, then add in dry ingredients, stirring until a shaggy dough forms.

Turn out onto to a lightly floured surface and knead until elastic and only slightly tacky, adding more flour a teaspoon at a time if needed, about 5 minutes.

Form into a tight ball then place dough in oiled bowl and cover with a clean dish towel. Let dough rise in a warm spot in your kitchen until doubled in size, about 1 hour.

Line a large baking sheet with parchment. Alternatively if making letters: make sure that the donuts donโ€™t lose their shape when moving them to the Dutch oven to fry, you can put donuts on individual squares of parchment paper and just gently tip them into the pot when youโ€™re ready to fry.

Punch down dough, then turn onto a lightly floured work surface and roll out into a ยฝโ€ thick rectangle. Using a donut cutter or 3โ€ and 1โ€ biscuit cutters OR letter cookie cutters, punch out your donut. Re-knead scraps together and punch out as well.

**To make letters, I just rolled out the dough a little thinner than 1/2″ and I used medium sized letter cookie cutters. The dough was a little tricky to get through all the way through cleanly with my plastic cookie cutters, so if you roll the rolling pin on top of the cookie cutters it forces it through and was so easy to get off. I think metal cookie cutters would probably work a little better if you need to buy some, but the plastic did work fine!

Place donuts and holes onto baking sheets, cover with dish towel, and let rise again, about 40 minutes more.

Make glaze: In a large bowl, whisk together milk, powdered sugar, and vanilla until smooth. Set aside.

Line a large baking sheet with paper towels. In a large dutch oven over medium heat, heat 2” oil to 350ยฐ. Cook donuts, in batches, until deeply golden on both sides, about 1 minute per side. Holes and small shapes will cook even faster!

Transfer donuts to paper towel-lined baking sheet to drain and cool slightly. Dip into glaze, then place onto a cooling rack (or eat immediately!).


I hope you guys try these!! In the shape of letters or not! They were declared delicious in our house.

Sources for the curious:
My beloved enamel Dutch oven.
– I would like to be buried with my kitchen aid mixer.
Best cookie sheets ever. I like the extra large size, but be forewarned that they are truly huge. If youโ€™re short on space, look for this medium size.
This candy thermometer has never done me wrong. This is one recipe you truly do need a thermometer for.
– Alphabet cookie cutters. Metal. Or plastic.
– We store all of our dry goods in jars. The gallon cracker size is great for bulk things like flour, sugar, pasta, rice. We use the half gallon size for whole wheat flour, snacks, cereal, etc. and then, these small latching jars are great for dry beans, lentils, quinoa, nuts, cocoa powder, etc.
– I always use this yeast brand.
– I use these enamelware mixing bowls every single day.
– The best cooking rack.
– I want these sweet plates for serving little treats.
– I donโ€™t usually wear an apron when I bake, but maybe I should?! Well, on second thought, maybe I’ll just make my own.
– Iโ€™ve been looking for a cute storage solution for muffins, and other small baked goods (like donuts!) this is a good one.


Please also note this terrifying surprise I found in the cookie cutters. Life with three little boys is never dull!

My Favorite Chocolate Chip Cookie Recipe.

We have gone through many, many chocolate chip cookies. I just feel like a home with three little boys and two adults should have homemade cookies on the counter at (nearly) all times. And let’s agree that of the multitude of cookie options in the world – chocolate chip cookies are the best. Sure, I love peanut butter, and oatmeal, and sugar, and and and, but chocolate chip cookies just scream HOME. But I don’t want any old chocolate cookie. I expect Greatness.

So, let’s talk recipes – I’ve tried many. Many many. I should probably be embarrassed by the number of recipes I’ve tried. I’ve tried the Levain Bakery Recipe, the world’s best recipe on nytimes, Joanna Gaines’ recipe from her cookbook, like three different recipes from the 100 cookies cookbook, the one on the tollhouse chocolate chip bag, the one on the Ghiradelli bag, a few random ones that have really great reviews on allrecipes.com, a whole bunch of others that aren’t worth talking about, and finally, finally, I have this one. My favorite. It’s from Everyday Reading‘s blog, which is…not a cooking blog and honestly it’s not one that I even follow closely, but I was so sold by her description when I read it a few years ago that I had to try it. If you haven’t noticed – it doesn’t take much to convince me to try something. I quickly declared it my favorite chocolate chip cookie recipe of all time.

But then after a few batches of Greatness, I decided that I had better keep trying others just in case because everyone else also says that they have the best recipe. And what if a better cookie is out there, but I haven’t tried it because I was so into this one?? But I’ve been underwhelmed by all others. This one is still it for me. Not gonna say I won’t keep trying others (just in case!), but these are the cookies I make when we have guests or when I’m bringing cookies to a party, or when I just want a really good cookie. When baked correctly, they’re done one the outside, but still perfectly soft on the inside. Not crunchy, not underdone – just perfect texture on the outside and inside. They’re beautiful. Beautiful! I know that it shouldn’t matter if a cookie is pretty or not if it tastes good, but these are PRETTY. And that means something to me. They’re what you want your cookies to look like when you’re sharing them with the world. And the taste – they’re just so dang good. Make them. Just try it. Tell me what you think! Are they really as good as I think they are? Do you have a better recipe? Because if you do – I need to try that one too. Just to make sure that this one really truly is THE best.


Chocolate Chip Cookies

2/3 cup butter, softened
1/2 cup packed brown sugar
1/2 cup granulated sugar
1 egg
1 tsp vanilla
2 cups semi-sweet or milk chocolate chips
1 3/4 cups purpose flour
1 tsp baking soda
3/4 tsp salt
coarse salt for sprinkling

Preheat oven to 375.

In a stand mixer, beat butter for about a minute. Add sugars and beat another minute or two. Scrape down sides of mixer with a rubber spatula. Add vanilla and egg. Beat again.

Add the flour, soda, and salt. Mix JUST until combined. It will look over-floured for a few seconds, but should come together fairly quickly.

Mix in the chocolate chips.

Scoop golf-ball size spoonfuls of dough onto cookie sheet, sprinkle each ball with a pinch of kosher or sea salt and bake for 9-11 minutes. They should be light-colored and puffed when they come out of the oven, but dry-looking (not shiny or wet). I often give them a little squish out of the oven on all the sides with a spatula to get that extra crinkly look on top. Then, let cool on the pan for about 3 minutes then transfer to cooling rack.

**Notes: For the cookies you truly deserve – use Ghiradelli 60% Cacao. It really does make a difference.

And if you know me at all, you know that I am partial to King Arthur’s unbleached all purpose flour in all things baking.

For perfectly sized cookies, I use this cookie scoop and I honestly don’t know how I lived without one before.