Pumpkin Yeast Rolls.

Well, I’ve posted about these over on Instagram nearly every day since I’ve made them. I wanted to put the recipe here for those of you (show of hands, mine included) who prefer to see a recipe on a website, rather than a tiny instagram screen. Is this waxing on about how everyone needs them a sign of obsession? I think it might be, and I think it’s also a sign that I need to make them again this weekend. Maybe…if our new fridge arrives on Saturday like it’s supposed to. Our died a tragic death this week, and we’re currently living on peanut butter sandwiches, bananas and ramen.

A little disclaimer – the pumpkin shape is very, I repeat, very cute. BUT you don’t actually need to spend the extra time to make them into the pumpkins. This recipe is delicious even in the shape of regular rolls. Especially if you slather them in butter and dip them in cinnamon sugar. I keep pitching them as a Thanksgiving centerpiece, but I think I might enjoy them even more on the breakfast table with a pile of fruit and a few slices of bacon. So good.
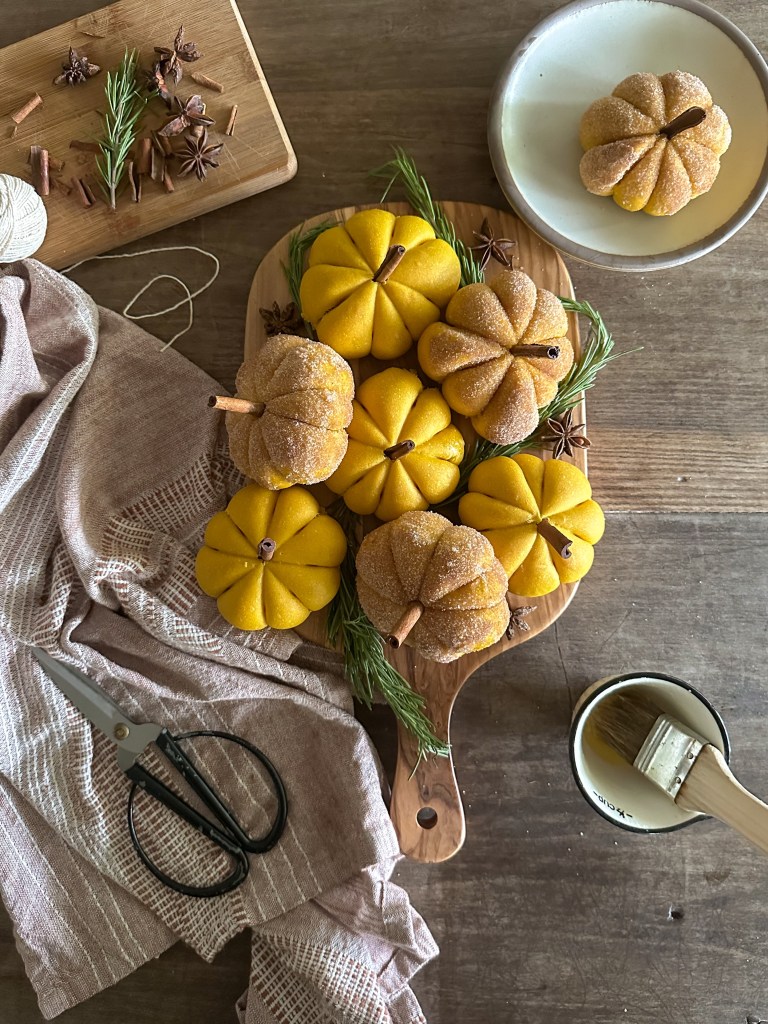

Pumpkin Yeast Rolls

Youโ€™ll need:
1/4 cup warm water
2 1/4 teaspoons active dry yeast
1/4 cup white sugar (1 tablespoon for yeast mixture, 3 tablespoons in the rest of the dough)
3/4 cup pumpkin puree
1/4 cup butter
1/2 teaspoon salt
1 egg
3 1/4 cups all-purpose flour (don’t add this all at once. depending on your pumpkin puree thickness, and baking conditions, you may not need it all!)
Cinnamon sugar & melted butter (optional)
Cinnamon sticks for stems!

To make:

  1. In a small bowl, add water, a tablespoon of white sugar, and yeast. Stir together and set aside to rise.
  2. In a small saucepan, stir together pumpkin puree and butter on a medium heat, stirring constantly. Allow to cool slightly.
  3. In a large mixing bowl, add 2 1/4 cups of flour, remaining 3 tablespoons of white sugar, and salt. Stir in yeast and egg, and mix well. Add in pumpkin and butter mixture. Add in remaining cup of flour, 1/2 cup at a time (*note: you may not need all of the flour depending on the consistency of your pumpkin puree – you want your dough to pull away from the bowl, but not to get too dry. A little stickiness is good as long as you can still work with it!) Stir well until dough comes away from the sides of the bowl.
  4. Turn dough onto a lightly floured surface, and knead for 5 minutes until smooth (again….it’s better if your dough’s a little sticky here, rather than adding too much flour). You can use your dough hook instead if you have a mixer!
  5. Cover with a clean, damp cloth, and let rest for 10 minutes.
  6. Divide the dough into 9-12 equal pieces, and roll into round balls. Cut a piece of string long enough that it can wrap around the dough ball four times. Youโ€™ll need a piece for each roll.
  7. Carefully place the center of the string over the first dough ball, flip over, cross the string over itself so it creates tension, flip the dough over again, and repeat. The goal is to create four equal cross sections of the ball. I shared a reel for how to do this! The string should be snug enough to stay in place, but no tighter than that, as it will tighten as the dough continues to rise. Tie a double knot at the end, and trim the ends of the string so they arenโ€™t too long. Place onto a baking sheet, and repeat for all remaining dough balls.
  8. Cover dough balls with a towel, and let rise for about 30 minutes, or until you can press a finger into the dough and it leaves an indent (if it bounces back quickly, it needs more rise time).
  9. Bake the dough for 15-17 minutes, or until golden. Remove and allow to cool slightly before cutting strings and gently removing. Serve warm.

    *if covering in cinnamon sugar – melt some butter and brush on the rolls while still warm. Roll around in cinnamon sugar. Add little cinnamon stems on top for cute factor!

Our Home in Lights.

If you’ve been following along on Instagram with our home renovations – you know that the ceilings have been a top priority. And ok yes, also the fireplace and taking down the wallpaper and, and and. But mostly the ceilings. We lived for years with our popcorn ceilings and lights that I hated in our previous home. When we finally got up the motivation to have the work done, I realized that they should have been our top priority to begin with. The ceilings you live with make such a gigantic difference in the feel of your home. So in our new home, they’ve been the first thing on the list. We removed popcorn ceilings before we even moved in (the dust it creates is – phew!!), the ceiling fans came next, and finally we decided we should just go for it and replaced the rest of the lights while we had someone coming to work on the house anyway. And let me tell you – I am so happy we did it. Our ceilings make me so happy now! So if you too are on the hunt for some new lights for your home – I’m here to share our picks. Maybe you’re ready to replace those boob lights that have been haunting your dreams?? I don’t know about you, but once I knew their nickname, I couldn’t bring myself to look at them for another moment.

  1. My favorite affordable Schoolhouse Light. We installed these in our old kitchen and entry and I’m just gonna say that you can’t go wrong with this classic. We installed them in the entry in this house and I love them so much. I also really love this one if you had a small hallway that you’re looking for. If you’re on the hunt for hallways – we installed these small ($10!!) acorn lights in our last house and I loved them too.
  2. Our beloved ceiling fans. The only fan I would put on a ceiling. We live in south Florida and neeeeeeeeed fans in our house. These blend into the ceiling and aren’t at all an eye sore. They pack a powerful breeze too!
  3. A ruffled pendant for over the sink. Just vintage style and cute.
  4. Flush Mount lights for over the island. These are right next to our rather eye catching table fixture. I wanted something to tie in with the pendant and the dining table light. I felt like these worked without being distracting. I didn’t want too many things hanging down from the cetiling and having flush mount lights over the island really opens up the space.
  5. A double light sconce for over our dresser. The only light that I really splurged on. I wanted something special for this little nook in between our bathroom and closet. This one is perrrrrfect. I thought that three lights would feel too much like a bathroom, and one light sconce wouldn’t fill the space right. I’m glad that I spent a little extra on something I felt was really perfect.
  6. Finally – our dining table light. I saw this on display at Home Depot and I was immediately like “YES” that’s the one. And then I chose the other kitchen lights to tie in with this one because I love it so much. It just fits the style of our new home, and I think it looks so pretty without being too MUCH for our open floor plan. I love the classic black chandelier that we put into our old house, but I just think this one goes a little better in this home.

There you have it! Our home in lights!

Meal Plan This Week.

We had the sweetest weekend with the best Mother’s Day a mama could ask for. On to a wonderful week where it’s all about the food, as usual.

Sunday – Steak, Brussels Sprouts, Scalloped Potatoes, and Bitter Greens & Orange Salad.

Monday – Sheet Pan Shrimp and Asparagus with Rice and Aioli.

Tuesday – Lemon-y Linguine with Garlic Bread. (adding peas and spinach to the pasta for some extra veg)

Wednesday – Warm Grain and Vegetable Bowl.

Thursday – Leftovers (or Meatballs in the likely case of – no leftovers left over) Going to post that meatball recipe here this week so it’s easier to find!

Friday – Pizza!!!

Saturday – Grill Party! Hot dogs, burgers, potato salad and all good grill food.

Bake – Mother’s Day Angel Food Cake with Vanilla Sugar Whipped Cream and Berries.

Treat – Blueberry Hand Pies with Buttermilk Ice Cream.

Warm Grain and Vegetable Bowl.

If you are in need of a simple and nourishing meal that warms you up from your insides out, you’ve found it here. I found this recipe in Ina Garten’s Go To Dinners (everything in it has been amazing so far), and it’s one that is going to be in heavy rotation at our house. I’m writing the recipe as I made it, which differs from the original. And of course, as always, you can make it your own by using different vegetables and grains, but you really should make the dressing as is. That’s what makes it all so very good. Now, please excuse me while I go add all of this to our shopping cart for next week.


Warm Vegetable and Grain Bowl

1 cup quinoa
Salt and pepper
1/2 red onion, cut into 8 wedges through the stem
1 1/2 pounds butternut squash, diced (I used a frozen bag for ease)
1/2 pound carrots, scrubbed and cut into sticks
1 tablespoon olive oil
5 oz greens such as spinach, kale, arugula or a mix
1/2 cup dried cranberries
1/2 cup toasted walnuts or pecans
creamy goat cheese, thickly sliced

For the dressing:
1/2 cup olive oil
1/4 cup white wine vinegar
2 teaspoons dijon mustard
1/2 teaspoon minced garlic

  1. Preheat oven to 400 degrees.
  2. Make quinoa according to package instructions, set aside.
  3. Combine the onion, butternut squash, and carrots on a sheet pan. Drizzle with olive oil, sprinkle with 2 teaspoons salt, 1 teaspoon pepper and toss. Spread the vegetables out in one layer and roast for 25 to 30 minutes, tossing once halfway through until all the vegetables are tender.
  4. Combine the dressing ingredients in a bowl with a whisk, or in a jar with a lid. Set aside.
  5. In a large salad bowl, combine your greens, cranberries, and toasted nuts (I just toast them in a cast iron skillet over medium for a couple minutes until they smell nutty and are golden brown. Watch them closely so they don’t burn.) Pour a little bit on your greens and toss.
  6. Serve the salad into your bowls, add quinoa, the goat cheese to taste and roasted vegetables on top. Drizzle a little more vinaigrette on top and season with salt if needed.
  7. Serve warm and inhale the whole thing.

Simple Joys Lately.

A weekly post to remind myself to look for and appreciate the simple things that bring joy to my every day.

This hat – for being the solution in the matter of the pesky thermostat. Now you see it, now you donโ€™t.

Weekend potatoes – for being a constant in the rhythm of our weekends. Iโ€™ll choose you every Saturday forevermore.

This basket of books – for being (almost) all good. And the joy of knowing that Iโ€™m headed back to the library with them tomorrow for a fresh stack.

This vintage croquet set given to us by sweet neighbors – because my parents have the same set at home and it makes me feel all melty thinking about my kids having the same memories about their childhood that I do about mine.

This sister cocktail scene – for filling up my literal and metaphorical cup every Friday. And because the Gimlets did not disappoint this week. Up next – Sazerac.

These warm sugar cookies – because I didnโ€™t even barely have to lift a finger to make them. Forever thanking my past self when I pull frozen cookie dough balls out of the freezer to bake on a whim.

Goodnight, friends! I hope you remember to pause and appreciate the simple joys in your life this week.