Sometimes I have a hard time deciding if something is worth a blog post when a picture is really all you need, but I know lots of people like to see links for the exact things used in said pictures, so here we are with a helpful little blog post to make your own seed packet valentines! This idea came to me one morning on my way to school as I was contemplating valentine options along with my deeply rooted desire for a giant vegetable garden. The two came together as if fireworks were going off in my brain. The pun options! The seed packet options! I mean, really, what could be more delightful than getting this as a valentine? I decided to give these to friends and family, and the boys are making crayon hearts to give to their classmates. They’ve been tucked away in little kraft paper envelopes and are traveling across the states to be opened and smiled over by Monday. And just in time for seed starting season for my northern friends.
Phrases:
You’re the real dill.
I’m wild about you, valentine.
I love you from my head tomatoes.
Lettuce be friends forever.
Will you be my valentine even though you’re chamomiles away?
And if you need another idea – we’re making these for the boys’ valentines for school, but word to the wise – soak the crayons in warm soapy water for 15 minutes and the paper practically falls off.
Feels a little late to be sharing this, February being a short month and it already being the 9th, but better late than never! But I can imagine this coming in handy next year when I’m looking for monthly to dos. I think I’ll share every month (but hopefully a little earlier next time!).
Now before I dive in, I should explain that I have a little monthly planning hack to help myself get more crossed off of my dreams list. Every month, I go through my calendar, and count how many weeks I have in which to fit a reasonable number of fun things. It’s generally four. So then, I have categories for things that matter to me. Baking, Treats, New Meals, Cocktails, and Home. Sometimes I change the categories, like if I want to focus on organization, for example, or marriage, mental health, physical health, the boys, outings, etc. What I’m saying is that you can choose any category you like. Then, for each of those categories I pick four things (or however many weeks we have) to do. So at the beginning of every new week during that month, I pick one thing from each of my categories and cross them off of my list. Doing my months this way makes me feel like I’m still getting to do what I love and I don’t get overwhelmed with the number of choices out there. Decision fatigue is real! Phew. Maybe I’ll have to post this little monthly planning hack again as a stand-alone post, but (drumroll please), here’s my February to do list – complete with links!
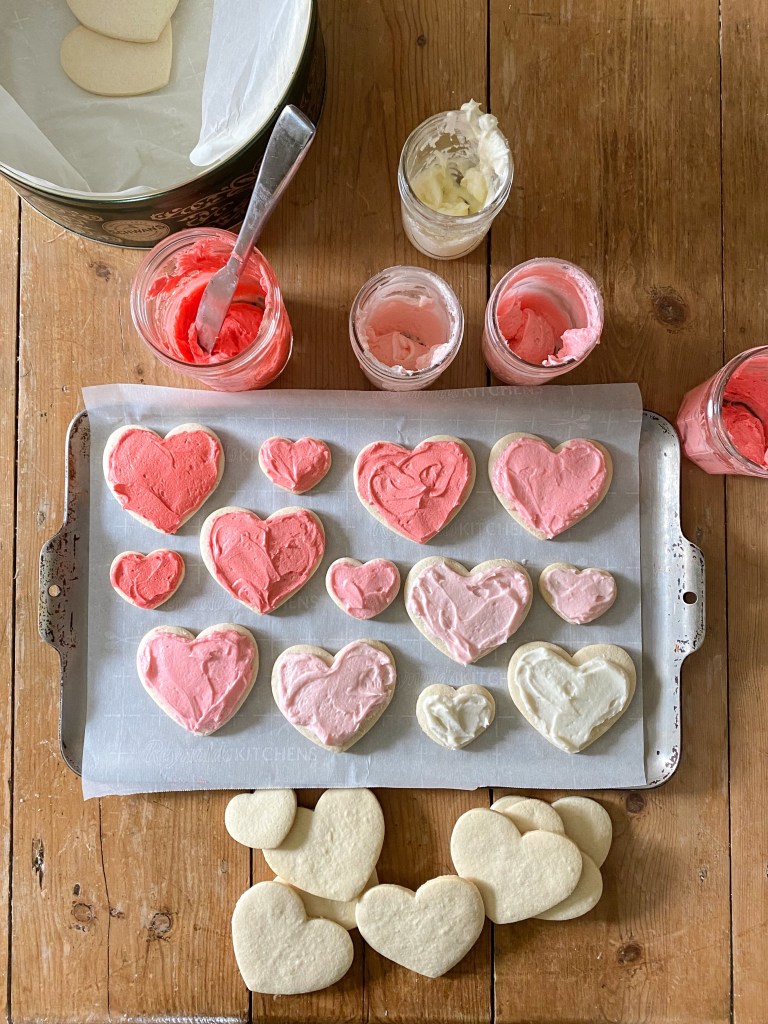
Don’t know if you’re keeping track, but there are exactly 21 days in which to fit as many heart themed treats as humanly possible. I just counted. So far at our house, we’ve made heart shaped chocolate chip cookies, sprinkled heart shaped sprinkles on everything we’ve eaten, made heart shaped banana muffins in a heart mold, cut strawberries into the shape of hearts and even smushed rice into a heart cookie cutter to make heart rice. Lol I know, I know. I’ve gone too far. I know what you’re thinking. Come on, Em! We all know that Valentine’s Day is a total commercialized crock of garbage! We don’t need one day to celebrate love! You know what my answer is? I don’t care! Nope! Not a bit! I love it! I love celebrating all holidays, commercialized or not. It’s an opportunity to make something special for my kids. And of course, an opportunity to foster my own personal joy too.
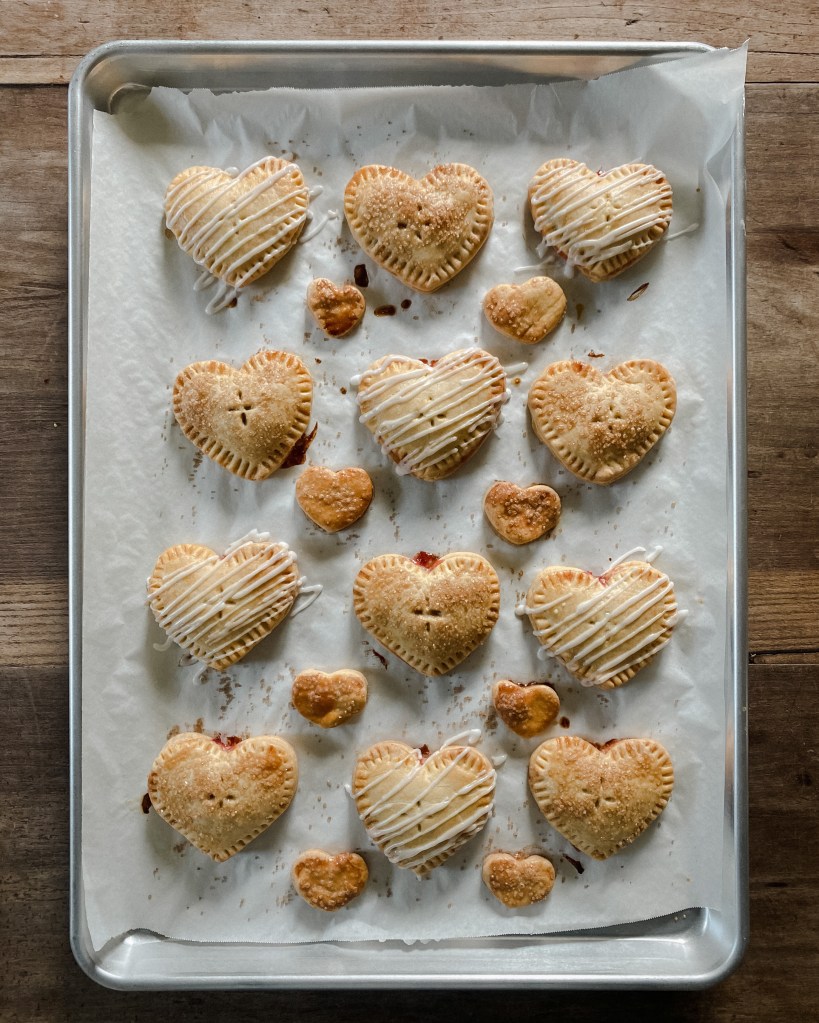
I love miniature pies in all forms, and these little heart hand pies are up there on my favorites list. If you would like to know how I made them, you have come to the right place. (See here and here for other mini pies I’ve done in the past).
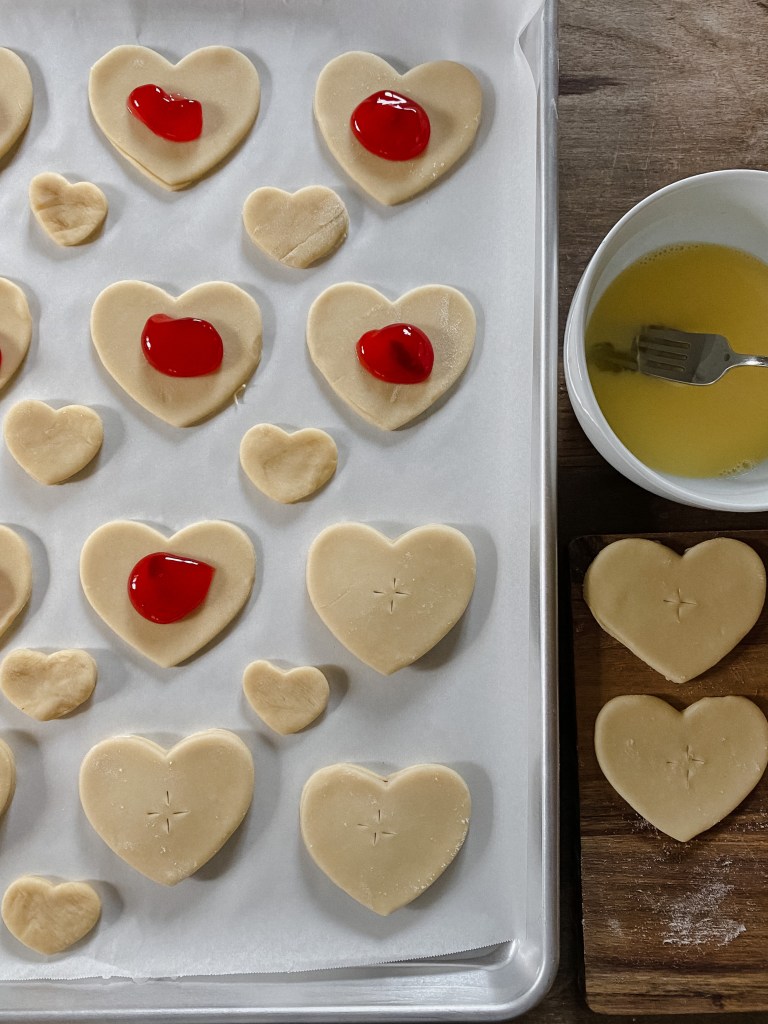
Now…of course you can and should use pie crust from the grocery store if that’s more your speed, but if you’ve never made a pie crust before you might try it! It’s incredibly easy after a little practice. I’ve always used Erin McDowell’s All Buttah crust from The Book on Pie and it’s never gone wrong on me, but there are a myriad of recipes out there. Find your favorite! For the filling – I just used regular old strawberry jelly from the jar, but you could do anything here. Pie filling, butter and brown sugar, lemon curd, cream cheese, Nutella. The sky is the limit really.
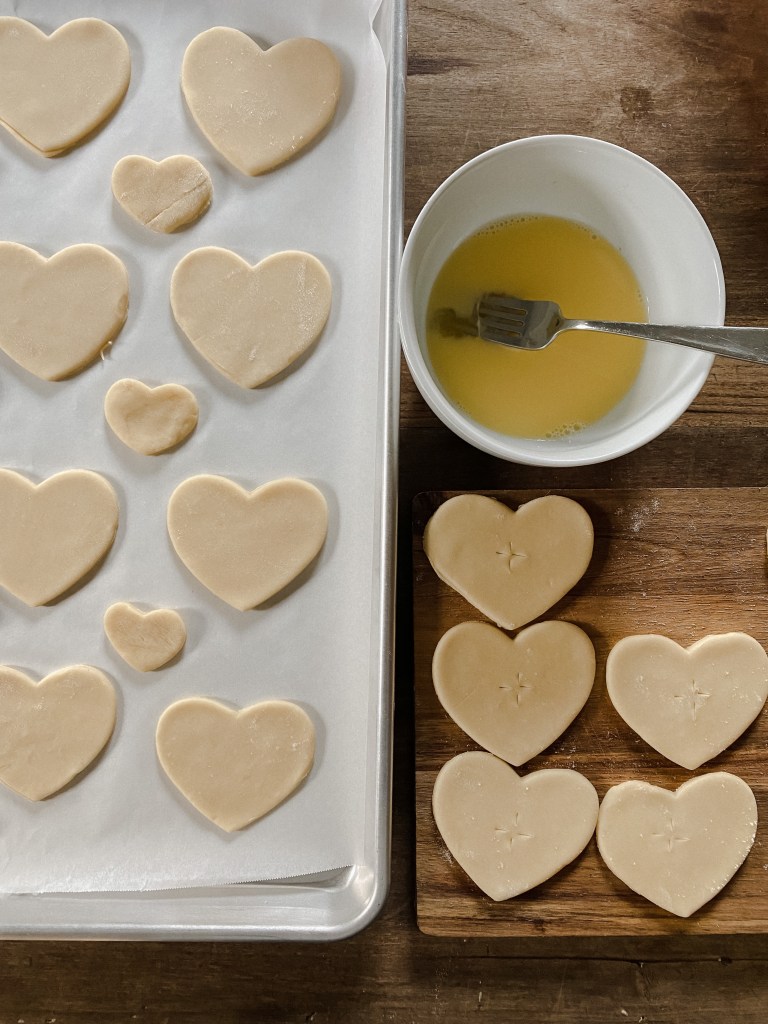
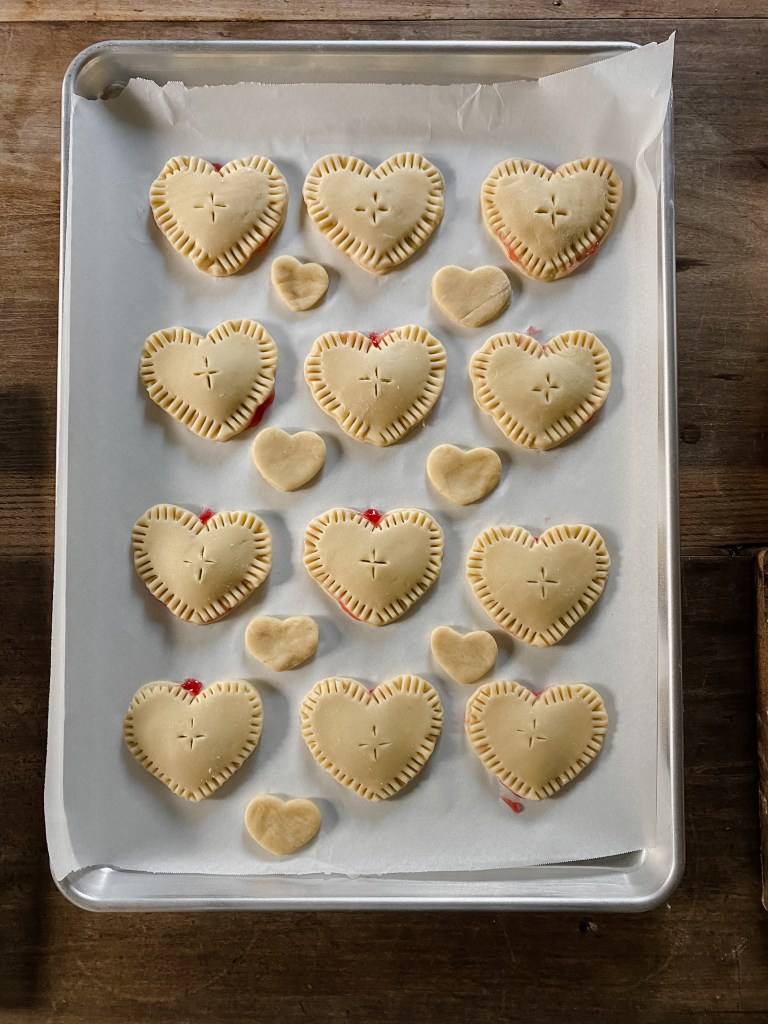
Alright let’s get down to the recipe, shall we? If you can even call if a recipe. It’s more of a method than anything. Get or make pie crust, cut out shapes, poke vents in top crust, add filling, add top crust, crimp, egg wash, bake. Those tiny hearts in the picture? Those are just little heart pie crackers. No filling. I just added egg wash, a sprinkle of Demerara sugar and baked.
Heart Hand Pies
2 pie crusts Filling of your choice Egg wash (one egg whisked with one tablespoon water) Demerara sugar or drizzly icing
Begin by preheating your oven to 375. Line two cookie sheets with parchment paper or silicone baking mats.
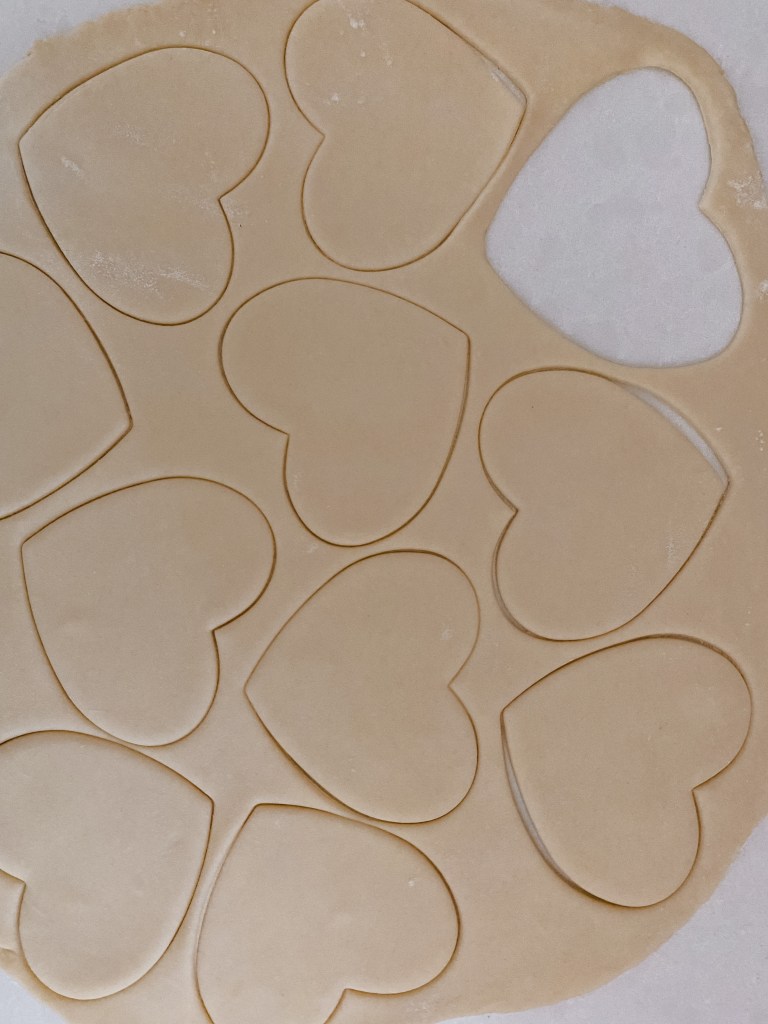
Roll out your pie crusts on a lightly floured surface to about 1/8 to 1/4 of an inch. Cut out as many hearts as you can (or any other shape!). Keep re-rolling the scraps until you have used as much as you possibly can. You (I hope obviously) want an even number. At this point I used the small cookie cutter to cut little heart cookies with the extra crust. If at any point your pie crust is feeling warm or too floppy to work with, put in the fridge or freezer for 5-10 minutes to firm back up. The colder they are, the better they will hold their shape while baking.
Now, set the bottom crust on your cookie sheet, add pie filling. How much will depend on the size of your shape. I used about a tablespoon, but wish I had squeezed in more. As for the top crust, you need to add vents with a fork or knife. This releases steam while you’re baking so the tops don’t burst in the oven. After adding the vents, place the top crust over the bottom, lining up the edges. Use a fork to crimp around all edges of your hand pie. Brush the tops of each pie with your egg wash and sprinkle Demerara sugar on top, if desired. (I sprinkled sugar on half and did icing on the other half after they were cool, but I have to tell you that the ones with icing were eaten first.) Again, after all this if your pies are feeling loose or floppy, stick them in the freezer or fridge for a few minutes to firm up. They will bake up much better if they’re cold!
Bake for 20-25 minutes or until golden brown on top and on edges. Let cool, and add icing if using. Enjoy!