For years, it was tradition that my dear teacher friend, Mrs. Whitney, would bring these chocolate peanut butter bars to every school potluck. When she retired a few years ago after 30 years of teaching at our school, she handed the recipe down to me to continue the tradition. And now I’m handing the recipe off to you! they are so simple, but so good.
Bookmark it for your next potluck!!
Mrs. Whitney’s Chocolate Peanut Butter Bars
1 cup butter 1 cup crunchy peanut butter 1 lb powdered sugar 10 sheets graham crackers, crushed to crumbs 12 oz semisweet chocolate chips
Melt butter in large pot and remove from heat.
Add peanut butter to pot and stir until mixed. Add powdered sugar and stir until incorporated. Add graham cracker crumbs and stir again until fully incorporated. Batter will be thick. You may want to use your hands to make sure all crumbs are mixed in.
Press mixture into 9×13 pan with flat, heavy spatula.
Melt chocolate chips. Microwave in 30 second increments & stir until smooth. Spread evenly over pan.
Chill in refrigerator for about 30 min. Cut into small squares. Mrs. Whitney says 48 squares but l’ve never been able to get quite that many!
monitor the 30 min cool time. If kept refrigerated to long, the chocolate will crack when cut. Take out when the chocolate loses its glossiness.
A couple of years ago, my mom made everyone in our family beautiful bound books with recipes from the whole family. Grandma’s sugar cookies are in there, a whole bunch of my mom’s recipes (cheesecake, meatballs, crab dip, spice cake, etc etc etc.) my dad’s buckeyes & golden cadillacs (wait until the holidays roll around and I’ll talk more about those), my sister’s shepherd’s pie, my banana bread, my cousin’s mexican layer dip, my aunt’s bourbon slush. You get the idea. If it’s a recipe from the Brown family – it’s in the book. She handwrote all of the recipes, had them copied and gave each one of us kids one. A rather beautiful heirloom sort of gift if you ask me. It’s cherished and I pull it out more than several times a year. Especially on the holidays where we can’t make it home to Indiana – I just need those recipes from home.
Well, having that recipe book (my sister and I refer to it as “The Family Bible”), made me start thinking about my own family and the recipes that I make over and over again. You guys know I love to try new recipes, but there’s nothing like making a food your family knows and loves. Well, I decided to start our own family food bible. Calling it a cookbook just sounds too official, doesn’t it? And it’s not as if I’ve made these recipes up. They’re just ones we love. When I find myself reaching for a recipe more than once, or if my family especially loved it, into the book it goes. My favorite vanilla birthday cake recipe is there, my favorite biscuits, dinner rolls, chocolate chip cookies, and the like. It’s largely full of baked goods. I should probably start jotting down some of our dinners too. I’ll get there eventually!
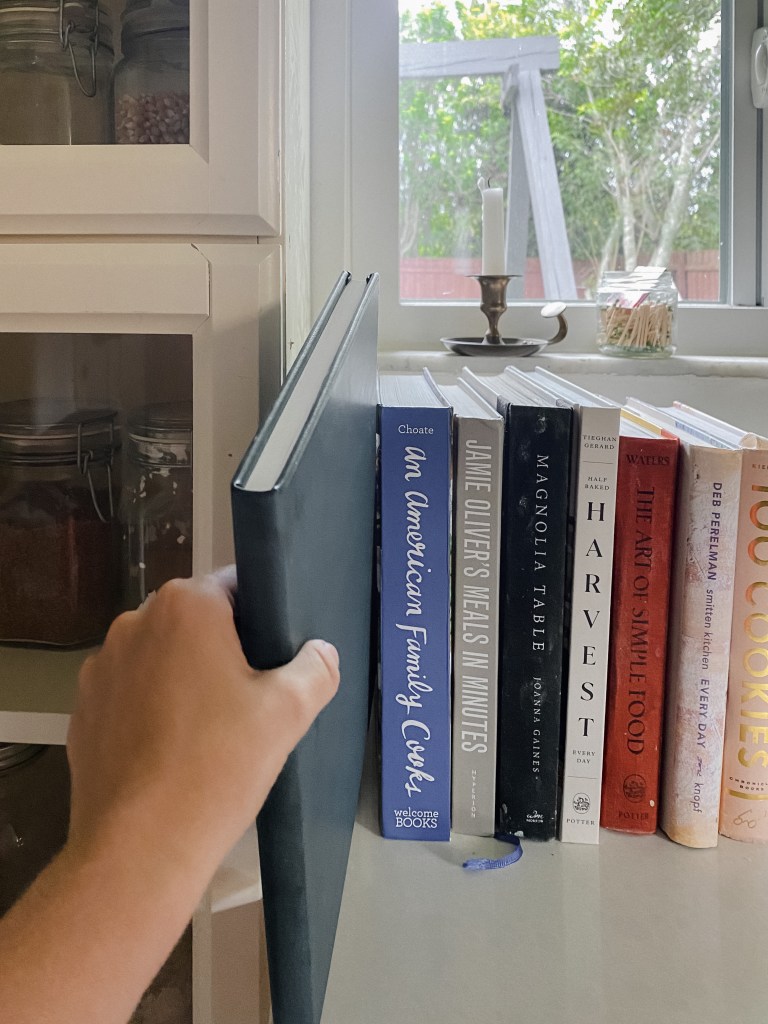
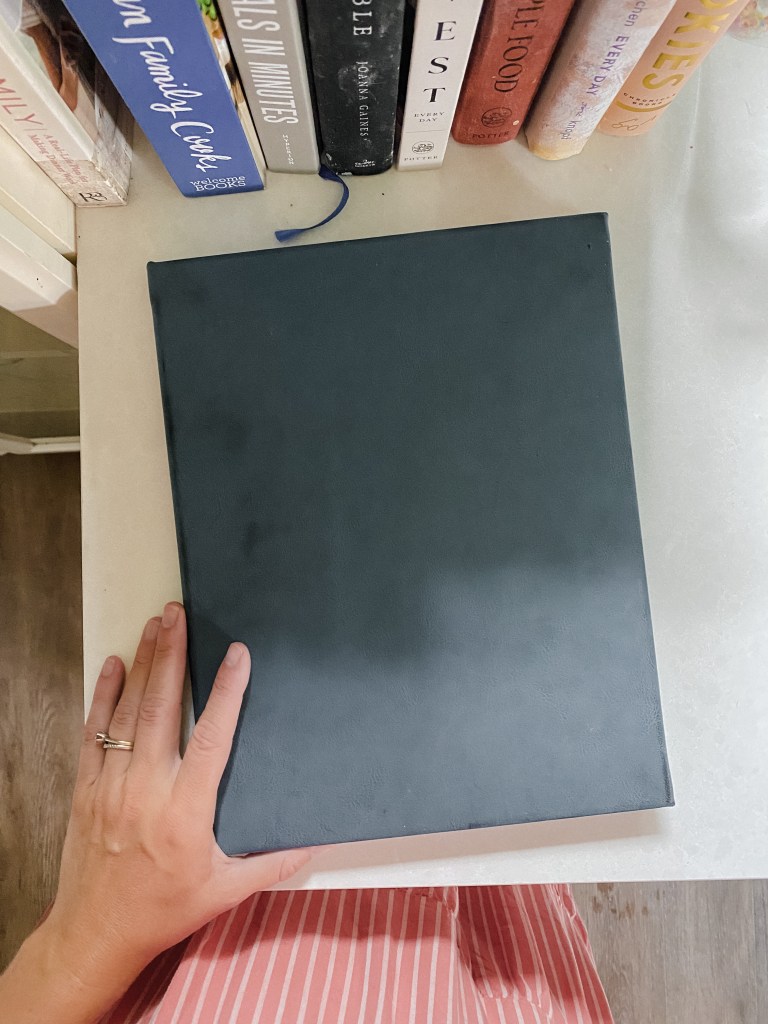
I’ve mentioned my little recipe book several times on Instagram – usually a comment like “This is so good it’s going in the recipe book!” and I always get questions. “Tell us more!” “Where is your book from?” “What’s the recipe book?” Well, I’m sorry to break the news to you that it’s nothing very pretty or fancy at all, it’s just a blank sketchbook from Michaels. You can probably get them anywhere art supplies are sold, or any type of office supply store, but over the years, I have a feeling it’s going to be one of those precious “grab in a fire” items for our family. There’s something about a handwritten recipe, isn’t there? I use a smaller sketchbook as my gardening book too – I jot down what I’ve planted, dates, outlines, notes on how things are growing.
Do you have something like this? My sister has a binder where she prints off recipes and puts them in, and I know lots of people have little recipe boxes with cards inside. I do love this book though. Over time, I’ll tweak recipes and include notes or maybe put in some little memories. I can imagine jotting down what Charlie first bakes on his own, or Ben’s favorite pizza toppings, or that Luke would only eat yeast rolls when he was two. The cover will get worn over time and years of being pulled out for the Birthday Cake recipe and the Christmas Cinnamon Rolls, and the First Day of School Blueberry Muffins, and I think that will make it even more precious to me. Watch my boys not care at all about it when they get older. HA! Maybe their wives will. Or maybe we need to go for just ONE MORE baby, perhaps a girl?? (insert a heart attack from my husband.)
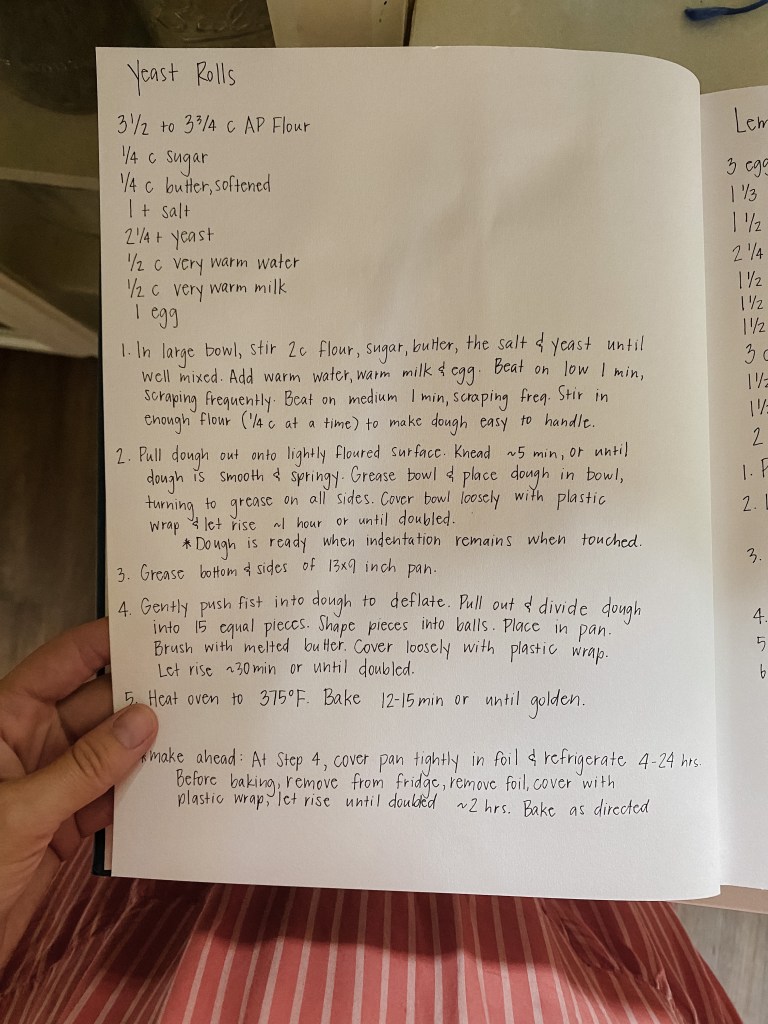
Recipes inside the Metroka Family Cookbook (so far)
Pizza night begins on Thursday night for me. After the boys are in bed, the house is cleaned up, the dishes are being whirred clean in the dishwasher, the laundry is tumbling, but generally just before I step into the shower, a little reminder goes off on my phone. *MAKE PIZZA DOUGH*. Yelling at me really. Telling me not to forget or else I’ll have to make an unwanted Friday stop at the grocery store for dough and 20 other things not on my list (though I wouldn’t mind some fresh flowers and a few bottles of Topo Chico). I’m always happy to do it after I get over the initial shock that I almost forgot again. I first trudge to the kitchen, and (most important step) I turn the lamp on that sits on the counter for extra coziness. I may pour myself just a splash more wine and then out of the pantry I pull the flour, the olive oil, the salt, the yeast from the fridge and a mason jar from the shelf to measure out my warm water. It’s a ritual that tells me – the weekend is almost here! All you have to do is just lean forward and momentum will take you right up to that moment you walk through your home’s front door on Friday night. On pizza night! The best family tradition that rolls around every single week with the predictability of clockwork. Wanted to get our favorite recipe down here because I’ve tried so many in the decade that we’ve done Pizza Friday (even before we had kids!) and this one truly is the best. It freezes well if you want to make it in bulk, it comes together in 10 minutes, you can make it the day of, or (if you’re a working mom like me) you can make it the night before and it goes into the fridge for an overnight rise. It tastes even better for the extended rise.
Pizza Dough
2 teaspoons/5 grams dry active yeast 1 3/4 cups/ 420 ml lukewarm water 4 ½ cups/625 grams all-purpose flour, plus extra for dusting 2 teaspoons/5 grams kosher salt 2 tablespoons/30 milliliters olive oil
Put the warm lukewarm water in a mixing bowl (use a stand mixer or food processor if you prefer – I always use my kitchenaid mixer). Sprinkle yeast over water and let dissolve, about 2 minutes.
Add flour, salt and olive oil and mix well until flour is incorporated and dough forms, about 5 minutes. It may look a little rough or pockmarked.
Lightly dust a work surface with flour. Turn dough out onto surface and knead lightly until it looks smooth, 3 to 4 minutes. Coat a bowl in oil and place your dough in the bowl and let rise in the refrigerator overnight. You can skip this rise in the refrigerator and use the dough right away, but this cool, slow rise makes it easier to stretch and gives the pizza a crisper texture and more nuanced flavor.) You can also freeze it for future use.
To make your pizza: preheat oven to 475. Get bowl out of fridge (I usually let it sit out for a couple hours first to make it easier to stretch) and pour out onto on a lightly floured surface. Split dough into either two pieces for large pizzas or into four for small. Form each piece into a smooth, firm ball. Flour lightly, cover loosely with plastic wrap and top with a kitchen towel. Leave to rest for about 15-30 minutes. Now is a good time to get your toppings ready, make your sauce.
Now, to bake pizzas stretch into your desired size. If you like thick pizza – make it thick. If you like thin – make it thin! You can do this with your hands or a rolling pin. We use cookie sheets to cook ours but you could anything. You can use either olive oil or fine cornmeal on your pan to ensure that it doesn’t stick. We like a crispier crust so we pre bake the pizza at 475 for about ten minutes before putting any of our toppings on. If you like a softer pizza – just add your toppings before you put it in. Baking time will depend on the thickness of your pizza, so it can vary from 10-20 minutes. Just keep watch the first few times you make it and make a note. We also like to broil for a couple minutes at the end for yummy cheese.
I’ll make another post soon with our pizza sauce recipe and topping ideas! Enjoy!